

How To Install Conduit In Existing Wall
How to Run a Conduit Through an Outside Wall
Running wires to outside features and secondary buildings is a mutual necessity for building owners. However, leaving exposed wires running along the outside of a dwelling house or building is never a safe idea. To protect these wires from the elements, many owners elect to run them through an outside wall with a conduit for an added layer of protection and simplified installation. A conduit provides a versatile tube for directing wiring, and it likewise protects the wires from harmful environmental weather.
This article discusses how to run a cablevision through an exterior wall using a conduit, including the tools and steps needed to go the chore done.
Using Conduits With Electrical Wires
Electrical wires are never without some level of chance. Wiring is sensitive by nature and can quickly become damaged when exposed to the elements, resulting in lost connections. Exposed wires can also present wellness risks to building occupants. In improver to the stupor take chances, the National Electric Manufacturers Association estimates that electrical problems cause over 67,800 house fires per year. Even sheathed wires can be cut or damaged over time, exposing the wires to the elements. To protect against these outcomes, many building owners choose to run their wiring through a conduit.
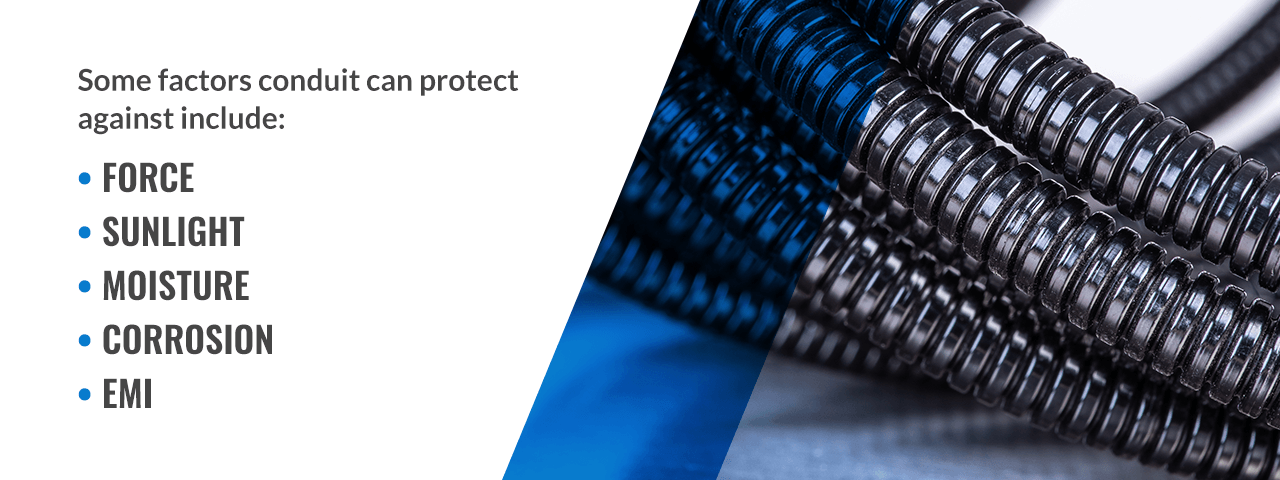
Conduits come up in a range of styles and materials to fit the job at manus. Metal and plastic conduits are common and may be flexible or rigid depending on the needs of the application. Regardless of the type, a conduit tin can help protect wires, especially in exposed locations where environmental conditions nowadays a higher gamble. Some factors conduit tin can protect against include:
- Strength: Conduit provides structural protection for wiring, preventing damage from impacts and crushing forces.
- Sunlight: UV rays can impairment wiring and corrode sheaths over time. Conduit protects against this through UV protective surfaces and coatings.
- Moisture: Conduits are resistant to moisture and water, preventing water harm to wiring in outdoor environments. Some conduits are completely waterproof and can fifty-fifty be submerged.
- Corrosion: Corrosion from ecology chemicals, water and sunlight presents a risk to wiring. Conduits, especially PVC conduits, help protect confronting this.
- EMI: Sure metal conduits tin assistance shield circuits from electromagnetic interference (EMI) in the surrounding environment.
On top of these protective benefits, most conduits have room for multiple wires. This actress space allows you to pull several wires through a single conduit, organizing your electric wiring for improved accessibility.
Things You lot Will Need
Earlier beginning an exterior wall cablevision pass-through using a conduit, y'all volition need to gather several tools. The tools you or your installer should take on-hand include the post-obit:
- Noncontact voltage tester: Earlier working with any electrical components, you or your installers demand to verify that the power to the excursion is completely turned off. A noncontact voltage tester is necessary to verify that no voltage is running through the work area.
- Stud finder: Stud finders are useful for locating wall studs in covered areas. You may demand to know the location of the studs to determine secure attachment points for the conduit.
- Nonmetallic sheathed cablevision or SE cable: This is the cablevision you will use for the installation. Be sure to choose a cable that fits the needs of the installation.
- Cable connectors:Cable connectors are the attachment points for cables. These need to be installed at the junction box and at the device box to which the cable will be connected.
- Attachments:Depending on the needs of the installation, y'all or your installer may need a diverseness of attachments to concord cables and conduits in place. Cable staples and straps are used to concord cables in place during installation, while conduit hangers go on a conduit in identify. These attachments may require nails or screws to secure. If the conduit or cable is beingness run along an area with no studs, you may as well need drywall anchors.
- Hammer: Hammers are necessary when using nails and staples to drive attachments into studs and drywall.
- Drill: Y'all or your installers will need a drill and an appropriately sized drill bit to create a hole in the wall for installing the conduit.
- Cablevision cutters: Cable cutters, as the proper noun suggests, are for cutting the cablevision to length. This tool is necessary to ensure yous don't take excess cable coiled upwards inside the conduit.
- Cable ripper or utility knife: A cablevision ripper or utility knife is helpful for removing the insulating outer jacket from cables. These volition exist needed to remove the jacket from the ends of the cables to make connections to the junction box and the terminating device.
- Wire nuts: Wire nuts are wire connectors that assist create safe connections at the junction box.
- Cable pulling equipment:Various cable pulling methods are available, each of which is suited to different conduit shapes and types. You or your installer may require a few different tools, depending on the method y'all make up one's mind to use. These tools may include cord, a conduit piston, fish tape or other tools.
Installers may crave additional equipment, such equally ell pullers, trench diggers or shovels, depending on the specific needs of the installation. Building owners should discuss the needs of the application in particular with their installation specialists to avert whatever delays due to missing equipment.
How to Run a Conduit Through an Exterior Wall
Once an installer has their tools and conduit on paw, they're ready to begin the installation. Here is a step-past-step guide on running a conduit through a wall. Please keep in heed that any conduit installation should be washed by or nether the guidance of a trained professional.
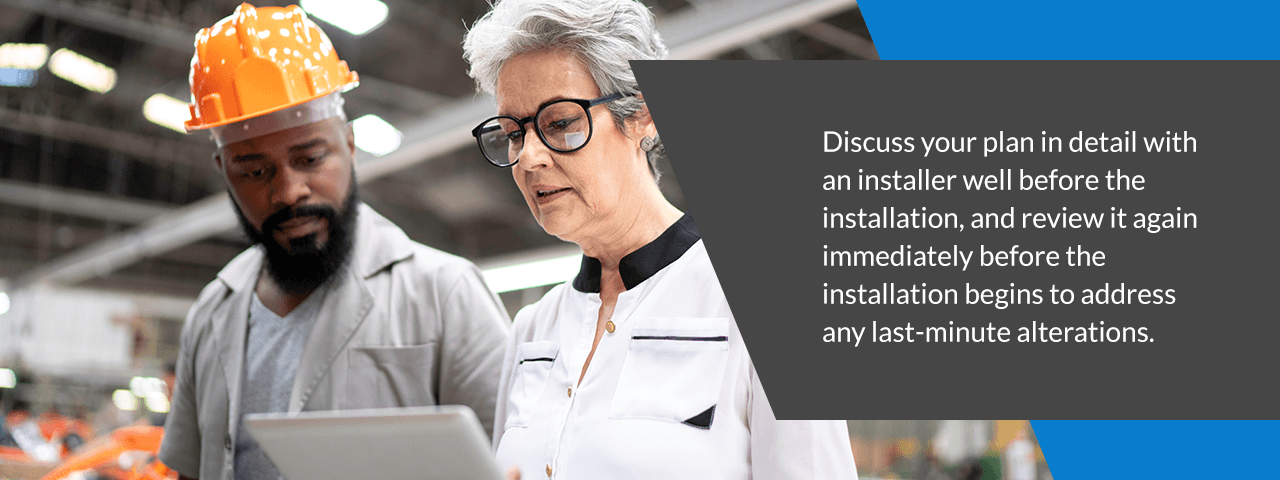
- Review the plan: The kickoff pace to any installation should exist a review of the plan for the conduit. Discuss your program in detail with an installer well before the installation, and review it again immediately earlier the installation begins to address any terminal-minute alterations.
- Turn off the power: Before showtime an electrical installation, make sure the ability to the circuit is turned off. Later turning off the correct circuit breaker at the service panel, the installer should use a noncontact voltage tester to verify that the circuit is turned off. If any voltage is detected, continue turning off circuit breakers until the reading is clear.
- Install connectors: Subsequently verifying that the ability is turned off, the installation team tin remove the comprehend of the junction box to install a cable connector for the new connection. They should also install a cablevision connector in the device box to which the new cablevision volition connect.
- Mark studs: Use a stud finder to find and marking all the wall studs between the junction box and the device box. During this time, verify the run path for the conduit and make any last-infinitesimal adjustments if needed.
- Drill a pigsty: Drill a pigsty in the wall where the conduit will exist installed. Be sure that the drill scrap is large enough to create a pigsty that the conduit can fit through. This is besides the time to drill any additional holes where the conduit volition exit or enter the wall over again.
- Cut and bend the conduit: Cut the conduit to the correct length for the installation. If the conduit is a flexible type, it will not need to be shaped. However, you or your installer will demand to shape a rigid conduit using a bender or fittings.
- Cheque the hole: Cheque that there is enough space for the conduit to fit through the hole subsequently it is shaped and widen information technology if necessary. Also, verify that no water is nowadays that may impact the integrity of the conduit.
- Slide in the conduit: Once the conduit and hole shape are verified, brainstorm sliding it through the pigsty in the wall. You may need an ell puller to aid with 90-degree bends.
- Install supports: Afterward the conduit is in place, install supports to attach it. In most cases, you will probable utilise conduit hangers. The first hanger should be 3 anxiety or less from the junction box, and any subsequent hangers should exist 10 feet apart at well-nigh. If possible, install conduit hangers at studs with screws. If no stud is available in an area that needs to exist secured, use a drywall anchor to attach the conduit hanger.
- Pull the wire through: Pull the cablevision all the way through the conduit. For a directly conduit, a string, conduit mouse or angling weight method may be used. For a conduit that has more angles and curves, fish tape is typically the best option. At that place are many cable-pulling methods, so choose the best i for your situation.
- Cutting and connect wire: After pulling the cablevision through, cutting the cable then it extends at to the lowest degree 8 inches from the front of both the junction box and the device box. After cutting the wire, utilize a cable ripper or utility knife to remove the outer jacket from the cable ends, then hold the stripped ends of the wires with the connecting wires at each box. Utilize a wire nut to consummate the connection. After the connections are consummate, replace the covers of the junction box and device box and plough on the circuit breakers to test the connection.
- Seal gaps: Later on verifying the integrity of the cable connection, utilise silicone caulk to seal whatever gaps between the conduit and the holes in the exterior wall.
Running Conduit Clandestine
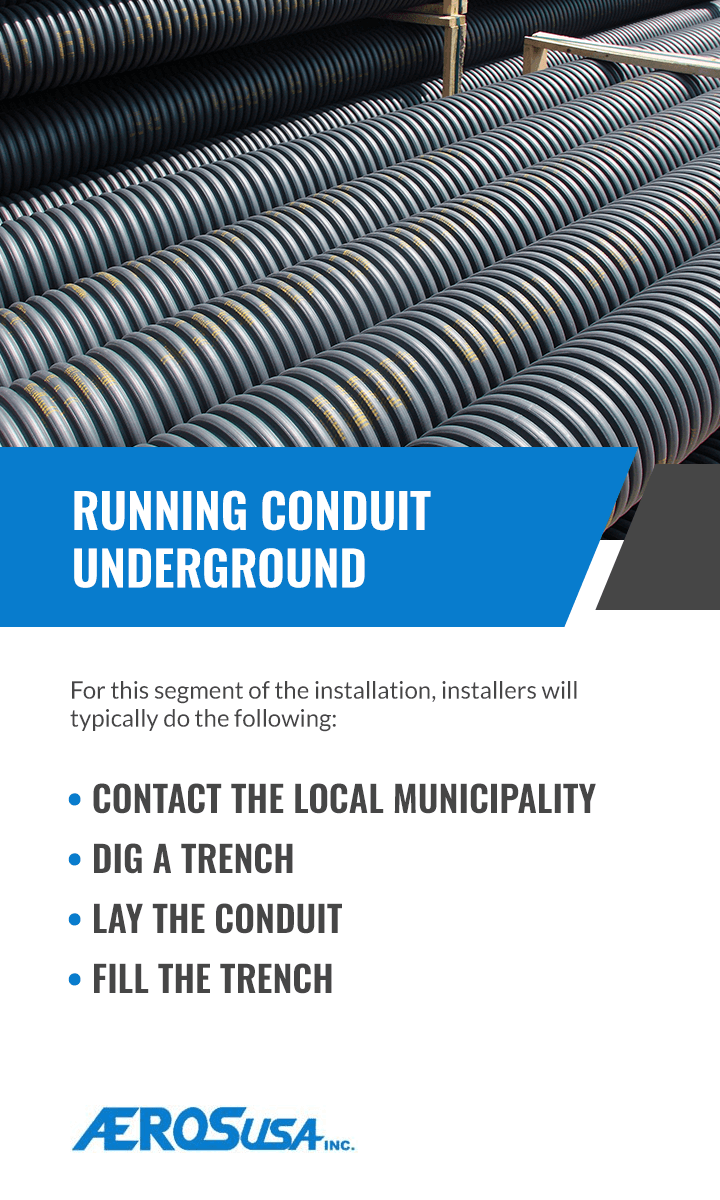
In some cases, a conduit running through an exterior wall may also need to be run surreptitious. This is common in cases where conduit needs to be run to a secondary building, such every bit a garage, workshop or maintenance shed. In these situations, you will need to dig a trench before the installation. For this segment of the installation, installers will typically do the following:
- Contact the local municipality: Earlier digging whatever hole, the owner and installer will demand to contact the local municipality to learn where existing electrical, h2o and gas lines are.
- Dig a trench: After identifying where existing lines are, you and your installer will plan the route for the conduit and dig a narrow trench about 2 feet deep using a shovel or trenching machine.
- Lay the conduit: After the trench is complete, the installer will lay the conduit along the trench.
- Fill the trench: Once the wire is run, the installer volition spread a layer of sand over the conduit to human action every bit a warning for futurity diggers. They may also put red caution tape over the sand as an additional warning. Once these layers are set up, the installer can top it off with soil.

Contact AerosUSA
Conduit is a valuable resource for protecting electrical wires in outside wall installations. With a adept installation team and quality conduit, edifice owners tin rest bodacious that their wiring is secure. If you're looking for quality conduit from a trusted supplier, AerosUSA has what y'all're looking for.
AerosUSA is a leader in the cable protection manufacture, founded by veterans and focused on providing quality products and customer-focused service. Headquartered in Harrisburg, Pennsylvania, AerosUSA works with innovative manufacturers to offer the latest in cable protection engineering science to customers beyond the world. Our product line includes:
- Braids and sleeves: AerosUSA'south protective sleeves include general-purpose sleeves, EMC shielding sleeves and sleeves for heavy-duty applications.
- Cable entry systems: This product line includes various accessories, splittable frames with inserts and rectangular and circular entry plates.
- Cablevision glands: Cable glands in our product line include metallic, stainless steel and constructed options, too as pressure balance, high temperature, strain relief and specialty EMC cable glands.
- Cable guide chains: Our guide chains include flexible or hinged options and lightweight yet strong chain channels.
- Conduits: Our conduits include braided, cobweb optic, metal, polyamide, plastic and specialty EMC conduits to meet the needs of whatever awarding.
- Fittings and connectors: Our connectors include metallic polyamide and plastic, likewise as and specialty EMC, T's and Y'south.
- Accessories: In addition to our other product lines, we as well offering various accessories, including adapters, support clamps, standard fittings, specialized fittings, and locking and sealing accessories.
From standard offerings to specialty conduits and cables, we have a total range of cable protection products. On tiptop of our product line, we offer exceptional assembly and engineering services to match our customers with their ideal solutions. Whether you're working in construction, HVAC, runway and transit, general machinery, renewable energy, mining or automation and robotics, we have the expertise and products that you demand for your unique application.
Learn more about our conduits and other production lines today. Contact AerosUSA to get started.

Source: https://aerosusa.com/how-to-run-a-conduit-through-an-exterior-wall/
Posted by: otiswitace.blogspot.com
0 Response to "How To Install Conduit In Existing Wall"
Post a Comment